
Small Bathroom, Bigger Feel: Layout and Storage Principles That Work
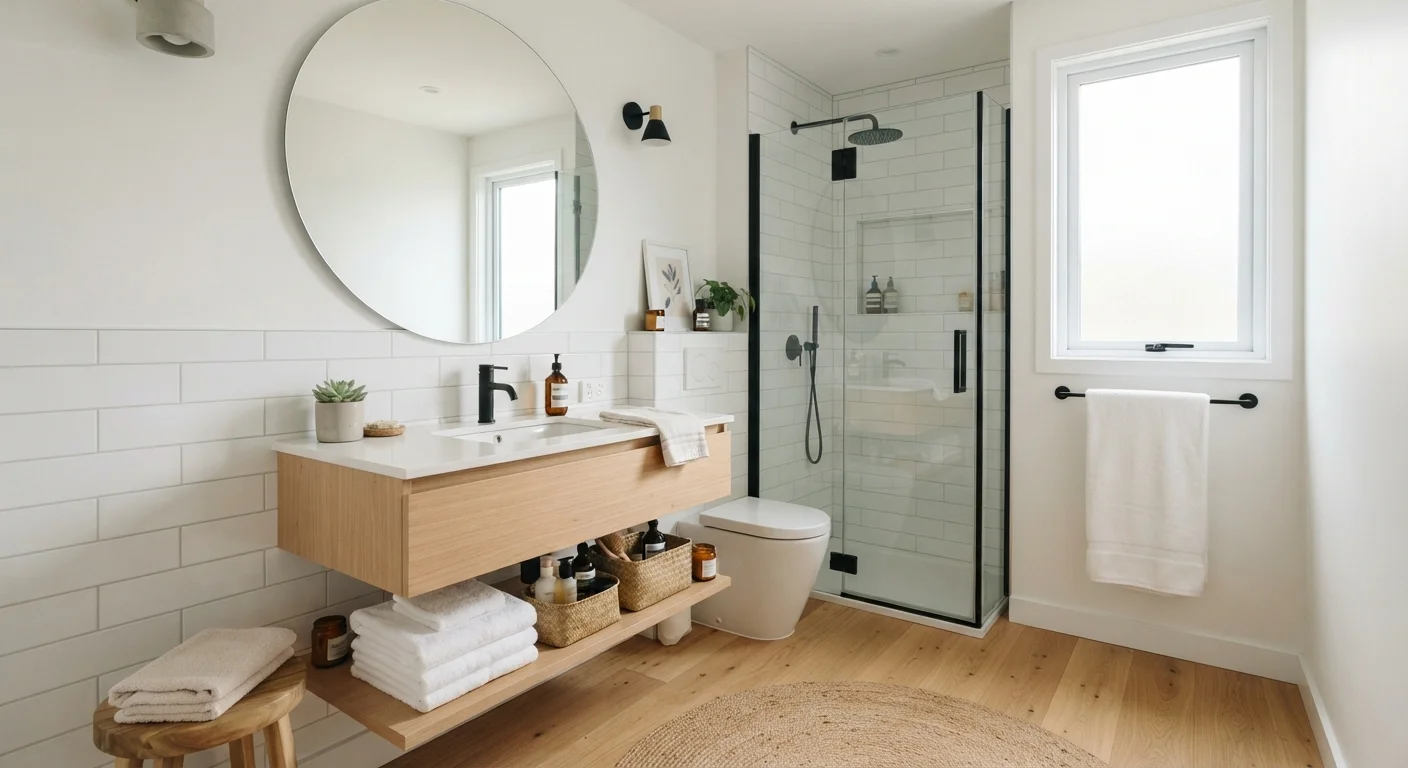
Photo credit: faqsnest.com
Explore design and storage strategies that make compact bathrooms more functional without a full gut renovation.
Key Takeaways
- Vertical storage — shelves above the toilet, tall cabinets — unlocks wall space that floor plans can't provide.
- A large mirror or mirrored cabinet visually doubles the perceived size of a small bathroom.
- Consistent color and material choices reduce visual clutter and make compact spaces feel cohesive.
- Floating vanities and wall-mounted fixtures keep the floor visible, making the room read as larger.
- Recessed niches and behind-door organizers add storage without encroaching on floor space.
- Most impactful small-bathroom changes don't require permits or structural work — just intentional decision-making.
Why Small Bathrooms Deserve More Design Attention
Bathrooms are the most used rooms per square foot in any home — yet they're often the last to receive thoughtful design attention. In a compact bathroom, every inch of wall, floor, and ceiling carries more design weight than in any other room. A poorly arranged 50-square-foot bathroom can feel chaotic and cramped; a well-considered one of the same size can feel genuinely comfortable to use every day.
The good news for homeowners and renters alike: most meaningful improvements don't require a gut renovation. Layout thinking, strategic storage, and a handful of visual principles do most of the heavy lifting. The same core ideas that guide broader interior design — proportion, rhythm, and emphasis, as explained in our guide to room design principles — apply just as powerfully in a bathroom, sometimes more so.
The strategies below focus on achievable changes: things you can do with standard tools, renter-friendly reversibility where possible, and no structural demolition required. Work through these principles in order, since decisions about layout and storage tend to cascade — getting fixtures right first makes every subsequent choice easier.
Go Vertical with Storage
Floor space in a small bathroom is fixed, but wall space above eye level is almost always underused. Tall, narrow shelving units, wall-mounted cabinets that reach toward the ceiling, and shelves installed above the toilet are among the most effective ways to add storage without shrinking the footprint.
The area above the toilet — typically 24 to 30 inches of open wall — can accommodate two or three shelves or a dedicated over-toilet cabinet. Use the upper shelves for items used less frequently (spare towels, backup supplies) and keep the most accessible shelf for daily-use items. Avoid stacking so many things that shelves look cluttered; visual noise works against the spacious feeling you're trying to create.
Unused wall space above the toilet is one of the most overlooked storage opportunities in a small bathroom.
Choose a Floating Vanity or Pedestal Sink
One of the most reliable ways to make a bathroom feel larger is to keep the floor visible. A floating vanity — mounted to the wall with the floor clear underneath — creates a visual break that signals openness. Pedestal sinks achieve something similar, though they sacrifice under-sink storage in exchange for visual lightness.
If you need the storage that a full vanity cabinet provides, a wall-mounted vanity with doors is typically the better trade-off. The key is avoiding a bulky base cabinet that runs to the floor on all sides, which visually anchors the room and makes walls feel closer together. Pair a floating vanity with a tall side cabinet if you need more closed storage nearby.
Keeping the floor visible beneath a floating vanity signals openness and makes the room read as larger.
Use a Large Mirror Strategically
Mirrors are among the most cost-effective tools for expanding perceived space. A mirror that spans most of the wall above the vanity — rather than a small, centered one — reflects light and the opposite wall, effectively doubling the visual depth of the room. This isn't an optical illusion so much as a straightforward principle of how the eye reads reflected space.
Mirrored medicine cabinets combine this effect with practical storage, eliminating the need for a separate cabinet and keeping the counter clear. If you're wall-mounting a mirror rather than a cabinet, consider going wider than feels instinctive — a mirror that extends close to the edges of the vanity has a much stronger spatial effect than one that floats in the center of the wall.
A wide mirror that spans the vanity wall reflects light and perceived depth far more effectively than a small centered one.
Simplify the Color Palette
Visual clutter is just as space-compressing as physical clutter. A bathroom with multiple competing tile patterns, a bold wall color, and a mix of fixture finishes can feel significantly smaller than its actual square footage. A restrained palette — typically two or three colors that share undertones — keeps the eye moving smoothly around the room rather than stopping and starting.
Light, neutral tones on walls and large-format tiles are a reliable baseline. If you want contrast or warmth, introduce it through a single element: towels, a plant, a small piece of art. Matching or closely coordinating fixture finishes (faucets, towel bars, toilet paper holder) reduces another source of visual fragmentation. The same principle of visual cohesion applies across room types, as outlined in our broader room design principles guide.
A restrained two-to-three color palette keeps the eye moving smoothly and avoids the compression of visual clutter.
Build In Recessed Storage Where Possible
Recessed niches — shallow storage spaces set into the wall between studs — add functional depth without projecting into the room. The most common application is a shower niche for shampoo and soap, but the same approach works in the area beside a toilet or above a vanity, depending on your wall configuration.
In most standard wood-framed construction, the space between wall studs is about 3.5 inches deep — enough for toiletries, rolled towels, or small baskets. Note that work involving opening walls requires attention to what's behind them (plumbing, electrical, structural elements), and you should consult a qualified contractor before cutting into any wall. For renters or those who prefer a non-invasive option, recessed-look organizers that mount flush to the surface can approximate this effect without any wall work.
Recessed niches add storage depth without projecting into the room — making them ideal where every inch matters.
Maximize Behind-Door and Corner Space
The back of the bathroom door and the corners of the room are two of the most consistently wasted areas in a small bathroom. Over-door organizers — the kind with multiple pockets or hooks — can hold a significant volume of frequently used items (hair tools, cleaning supplies, extra products) without using any floor or wall space. Most are entirely removable, making them well-suited to renters.
Corners can accommodate freestanding corner shelving units or wall-mounted corner shelves that take advantage of the angled space. In a shower, a corner caddy or tension pole system can hold supplies without requiring installation. When evaluating your bathroom layout, physically stand in each corner and look up — unused vertical space in corners is almost always available and often overlooked.
The back of the door and room corners are consistently wasted in small bathrooms — and among the easiest to reclaim.
Improve Lighting to Expand the Space Visually
Poor lighting — a single overhead fixture that casts harsh shadows — makes a small bathroom feel like a utility closet. Layered lighting that includes task lighting at the mirror (side-mounted sconces or a lighted mirror) and ambient fill creates a sense of depth and makes the room more pleasant to use.
Natural light, where available, should be maximized rather than blocked. Frosted glass windows allow privacy while admitting daylight; replacing heavy window treatments with a simple frosted film can make a meaningful difference. If your bathroom has no window, warm-toned LED lighting helps counteract the flat, compressed feeling of an artificially lit enclosed space. Lighting upgrades that involve new wiring or fixture installations in wet areas should be handled by a licensed electrician — bathroom electrical work is regulated in most jurisdictions and involves specific safety requirements.
Layered lighting — task light at the mirror plus ambient fill — creates depth and makes a small bathroom more livable.
Putting It All Together
No single fix transforms a small bathroom on its own — the impact comes from layering decisions that reinforce each other. Clearing the floor with a floating vanity works better when the mirror above it is generous. Vertical shelving earns its place when the color palette keeps everything visually quiet. Taken together, these principles align closely with the approach used room-by-room in our first-time decorator's checklist.
If you're renting, many of these strategies — adhesive hooks, freestanding shelving, peel-and-stick organizers — are fully reversible. Our article on making rented spaces feel like yours covers the renter-friendly design mindset in more depth. For homeowners considering a broader interior refresh, these bathroom principles connect naturally to the spatial strategies covered in our end-to-end interior design guide.
Start with one or two changes — often a better mirror and cleared counter — and observe the difference before committing to more. Small bathrooms respond quickly to intentional decisions, and even modest improvements tend to compound.
Start with a Counter Clear-Out
Before investing in new storage solutions, do a hard edit of what's on your counter and in your cabinets. Most bathrooms accumulate products that are rarely used, expired, or duplicated. Removing even a third of what's currently stored often reveals that existing storage is sufficient — just not organized. A clear counter has an outsized visual impact on how spacious the room feels.

Author
Home & Garden Editorial Team
Home & Garden Editorial Team is the collective byline for our editorial team and contributor network. Articles published under this byline or an editorial pen name are researched, written, and reviewed according to our editorial standards for clarity, consistency, and independence before publication.
View all articles →